
AWS が Auto Scaling、CloudWatch、Elastic Load Balancing を発表した時は興奮して、すぐに触ってブログに書きました。
- Amazon EC2 新機能 Monitoring, Auto Scaling and Elastic Load Balancing を一通り触ってみた
- Amazon EC2 Auto Scaling をもう少し詳しく見てみた
その情報を元にして 「よくわかるAmazonEC2/S3入門」を執筆した のだけど、4年前の情報なのでもう古くオートスケーリングの設定方法も変わったようだったのでしっかり追いつきたいと思って再び触ってみた。
結論的には以前と同じように思った通りの挙動が確認できた。AWS のドキュメントも充実していて理解をだいぶ助けたが、ちょいちょい間違っている点があったり、基本的にパラメータが多くて説明が少ないので、ユーザにはとっつきにくいというより、ちゃんと動かすまでに結構大変な思いをするものなのは変わらないようだ。
ただ、実践でちゃんと使えるようになると魔法のツールになるので、設定方法を紹介してお役に立てれば幸いです。
参考URLとしては、AWS のドキュメントサイトの Auto Scaling – Scale Based on Demand に沿って進めるとできるが、その通りだと動かない部分もあり、ちょっとした解説や補足を加えて日本語で以下に書いていきます。
目指す挙動
オートスケーリングを活用して実戦的に使える設定方法としては、
- 常にインスタンスの負荷状態をモニタリングしている
- モニタリングのある閾値を超えたら自動的にインスタンス数を増減させる
- 起動したインスタンスは ELB の配下に置かれる
これができると例えば、Webフロントサーバのスケーラブルな環境を作ることができる。
自動的にスケールしてくれるので、今まで人間リソースに頼っていた部分が丸ごとなくなってコストカットも狙える。
ただ注意点は、起動したインスタンスは起動後処理を開始できることを担保してあげないといけないので、ファイルのデプロイやアプリケーションの自動起動などを行うためのセッティングや起動スクリプトの用意などが必要。
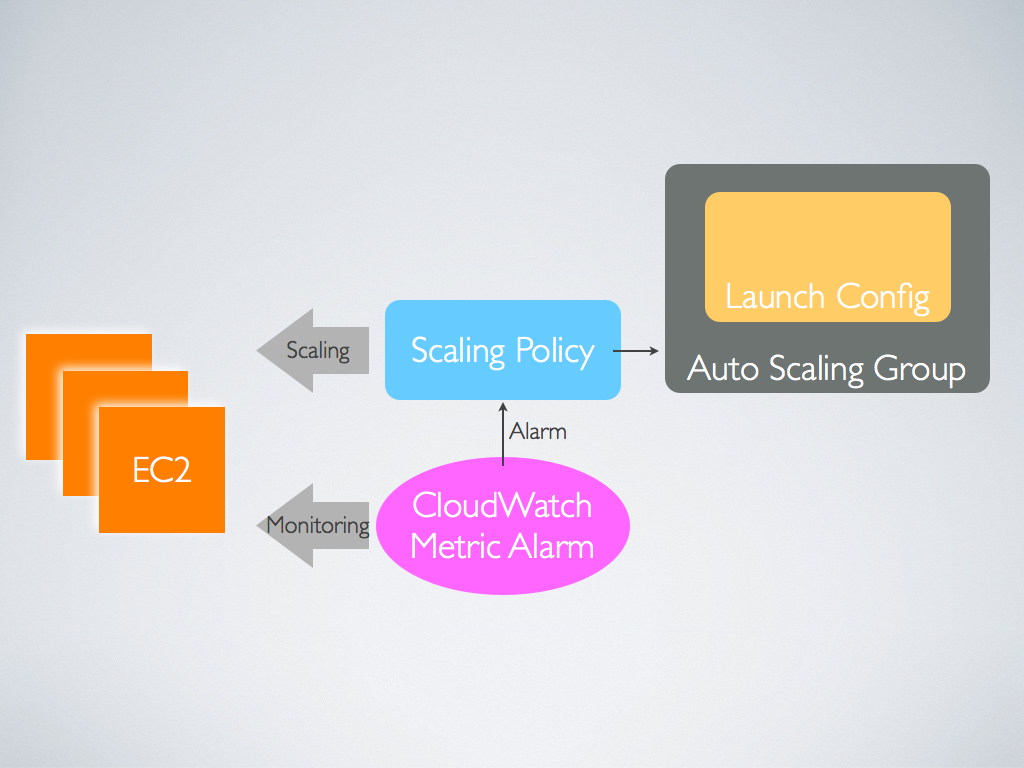
Auto Scaling 設定概要
オートスケーリングの設定は複数の設定を組み合わせて動作させる。
- launch-config : インスタンスの起動情報を設定する。AMI、インスタンス、キーペア、セキュリティグループなどを指定する
- auto-scaling-group : オートスケーリングの中心となる設定。最大最小起動インスタンス数、ELB、アベイラビリティゾーンなどを指定する
- scaling policy : インスタンスを増減方法の設定。一度に立ち上げるインスタンス数などを指定する
- metric-alarm : CloudWatch における閾値の設定。どんな条件の時にアラートを出すかを指定する
上の3つが Auto Scaling コマンドで実施し、最後は CloudWatch コマンドで実施する。
各設定と挙動を整理すると以下の図のようになる。
準備
現在 オートスケーリングの設定はコマンドラインからのみのようなので、コマンドラインツールをダウンロードして、自分の環境に適用させる。
- Auto Scaling Command Line Tool : http://aws.amazon.com/developertools/2535
- CloudWatch Command Line Tool : http://aws.amazon.com/developertools/2534
自分の環境への適用方法は割愛。
結果として、ターミナルで as コマンドと mon コマンドが実行可能になっていること。
各コマンドを理解するには [コマンド] -h としてヘルプを見る。必須項目は何か、オプションの意味などが分かる。
launch config の設定
as-create-launch-config で launch config の作成をする。
以下は、
- launch-config 名 : demo00-test04
- AMI : ami-893cab88
- インスタンスタイプ : t1.micro
- キーペア : deesea
- セキュリティグループ : quick-start-1
- リージョン : ap-northeast-1 (Tokyo)
とした場合の設定方法
$ as-create-launch-config demo00-test04 --image-id ami-893cab88 --instance-type t1.micro --region ap-northeast-1 --key deesea --group quick-start-1
キーペアとセキュリティグループは必須項目ではないのだけど、設定しないとサーバにログイン出来ない、サービスできないことになるので現実的には必須項目。
確認する時は、as-describe-launch-config する
$ as-describe-launch-configs -H
LAUNCH-CONFIG  NAME           IMAGE-ID      TYPE
LAUNCH-CONFIG  demo00-test04  ami-893cab88  t1.micro
Auto Scaling Group の設定
as-create-auto-scaling-group で auto scaling group を作成する。
以下は、
- auto-scaling-group 名 : demo00-test00-group00
- 適用させる launch config 名 : demo00-test04
- (必要であれば) 起動したインスタンスを配下につける ELB 名 : demo00
- 起動最大インスタンス数 : 10
- 起動最小インスタンス数 : 2
- アベイラビリティゾーン : ap-northeast-1a, ap-northeast-1c
- リージョン : ap-northeast-1 (Tokyo)
とした場合の設定方法
$ as-create-auto-scaling-group demo00-test00-group00 --launch-configuration demo00-test04 --load-balancers demo00 --max-size 10 --min-size 2 --availability-zones ap-northeast-1a,ap-northeast-1c --region ap-northeast-1
この設定をした時点で、min-size 数のインスタンスが自動的に起動する。
min-size は「常に起動するインスタンス数」になるので、min-size 1 以上にすれば落ちない状態を作ることができる。
確認する時は、as-describe-auto-scaling-groups する
$ as-describe-auto-scaling-groups
AUTO-SCALING-GROUP  demo00-test00-group00  demo00-test04  ap-northeast-1c,ap-northeast-1a  demo00  2  10  2  Default
INSTANCE  i-eaea06ee  ap-northeast-1c  InService  Healthy  demo00-test04
INSTANCE  i-48c9254c  ap-northeast-1a  InService  Healthy  demo00-test04
起動したインスタンスも表示される。この場合2つのインスタンスが ap-northeast-1a と ap-northeast-1c に分散して起動されていることが分かる。
修正したい時は、as-update-auto-scaling-group を使う。修正したい部分だけ書けばアップデートされる。
$ as-update-auto-scaling-group demo00-test00-group00 --launch-config demo00-test05
アップデートコマンドがあるのは auto scaling group だけなので、AMI を更新した時の適用方法は、
- as-create-launch-config で新しい launch config を作成
- as-update-auto-scaling-group で適用させる launch config を変更
- as-delete-launch config で古い launch config を削除
という流れを踏む必要がある。
Scaling Policy の設定
as-put-scaling-policy で scaling policy を作成する。
スケールアウトとスケールインそれぞれに対して設定する。
以下は、スケールアウト用
- scaling policy 名 : demo00-test00-outpolicy00
- 適用する auto scaling group 名 : demo00-test00-group00
- adjustment トリガーに引っかかった時に増やす値 : 50
- type adjustmentの単位 : PercentChangeInCapacity
- リージョン : ap-northeast-1 (Tokyo)
adjustment 50 で type が PercentChangeInCapacity と言うことは。全体のキャパシティに対して 50% 増加する分のスケーリングをするという意味。現在の起動インスタンス数が2だったら、2の50%の1インスタンスを起動して合計3インスタンスになる。現在のインスタンス数が10だったら、5インスタンス増えて合計15インスタンスになる。
$ as-put-scaling-policy demo00-test00-outpolicy00 -g demo00-test00-group00 --adjustment 50 --type PercentChangeInCapacity --region ap-northeast-1
arn:aws:autoscaling:ap-northeast-1:910777643605:scalingPolicy:801eb489-69c7-4ecd-8b5c-60e7509c9dbf:autoScalingGroupName/demo00-test00-group00:policyName/demo00-test00-outpolicy00
以下は、スケールアウト用
- scaling policy 名 : demo00-test00-inpolicy00
- 適用する auto scaling group 名 : demo00-test00-group00
- adjustment トリガーに引っかかった時に増やす値 : -1
- type adjustmentの単位 : ChangeInCapacity
- リージョン : ap-northeast-1 (Tokyo)
インスタンス数を減らすので、adjustment はマイナスの数字になる。
ここでは単純に1インスタンスを減らす設定内容。
$ as-put-scaling-policy demo00-test00-inpolicy00 -g demo00-test00-group00 --adjustment=-1 --type ChangeInCapacity --region ap-northeast-1
arn:aws:autoscaling:ap-northeast-1:910777643605:scalingPolicy:0ce7a750-7fa1-46fc-a316-d2647013aa3f:autoScalingGroupName/demo00-test00-group00:policyName/demo00-test00-inpolicy00
arn: から始まる出力結果は次で設定する CloudWatch の設定時に使うのでメモっておく。
as-describe-policies コマンドの POLICY-ARN 項目でも確認できる。
metric alarm の設定
CloudWatch のコマンド mon-put-metric-alrm を使って閾値を設定する。
これもスケールアウトとスケールインそれぞれ設定する。
以下は、
- アラーム名 : スケールアウト demo00-test00-AddCapacity01、スケールイン demo00-test00-RemoveCapacity01
- モニタリングする項目 metric-name : CPUUtilization
- 適用サービス名 namespace : AWS/EC2
- モニタリング値の統計項目 : Average
- 監視間隔 : 60 (sec)
- 閾値 : スケールアウト 90、スケールイン 40
- 検出条件 : GreaterThanOrEqualToThreshold (閾値の値と等しくもしくは超えた時)
- 監視対象 dimensions : AutoScalingGroupName=demo00-test00-group00 (スケーリンググループ全体に適用しているのがポイント)
- アラームを出すまでに連続で閾値を超えた回数 evaluation-periods : 2 (この場合、監視間隔60 x 2 = 120sec後にアラームを発生する)
- アラーム発生時の処理 :
- スケールアウト arn:aws:autoscaling:ap-northeast-1:910777643605:scalingPolicy:801eb489-69c7-4ecd-8b5c-60e7509c9dbf:autoScalingGroupName/demo00-test00-group00:policyName/demo00-test00-outpolicy00
- スケールイン arn:aws:autoscaling:ap-northeast-1:910777643605:scalingPolicy:801eb489-69c7-4ecd-8b5c-60e7509c9dbf:autoScalingGroupName/demo00-test00-group00:policyName/demo00-test00-outpolicy00
- (as-put-scaling-policy 出力結果)
- リージョン : ap-northeast-1 (Tokyo)
とした場合の設定方法
namespace は AWS のドキュメントだと “AWS/EC2″ とダブルコーテーションで囲ってあるが、これだと設定はできるが挙動時にエラーになって動作してくれない。
$ mon-put-metric-alarm --alarm-name demo00-test00-AddCapacity01 --metric-name CPUUtilization --namespace=AWS/EC2 --statistic Average --period 60 --threshold 90 --comparison-operator GreaterThanOrEqualToThreshold --dimensions "AutoScalingGroupName=demo00-test00-group00" --evaluation-periods 2 --alarm-actions arn:aws:autoscaling:ap-northeast-1:910777643605:scalingPolicy:801eb489-69c7-4ecd-8b5c-60e7509c9dbf:autoScalingGroupName/demo00-test00-group00:policyName/demo00-test00-outpolicy00 --region ap-northeast-1

$ mon-put-metric-alarm --alarm-name demo00-test00-RemoveCapacity01 --metric-name CPUUtilization --namespace=AWS/EC2 --statistic Average --period 60 --threshold 40 --comparison-operator LessThanOrEqualToThreshold --dimensions "AutoScalingGroupName=demo00-test00-group00" --evaluation-periods 2 --alarm-actions arn:aws:autoscaling:ap-northeast-1:910777643605:scalingPolicy:0ce7a750-7fa1-46fc-a316-d2647013aa3f:autoScalingGroupName/demo00-test00-group00:policyName/demo00-test00-inpolicy00 --region ap-northeast-1
確認
CloudWatch の設定が正しくできているか mon-describe-alarms コマンドで確認する。
$ mon-describe-alarms --region ap-northeast-1 --headers
ALARM                           STATE  ALARM_ACTIONS                             NAMESPACE  METRIC_NAME     PERIOD  STATISTIC  EVAL_PERIODS  COMPARISON                     THRESHOLD
demo00-test00-AddCapacity01     OK     arn:aws:autoscalin...-test00-outpolicy00  AWS/EC2    CPUUtilization  60      Average    2             GreaterThanOrEqualToThreshold  90.0
demo00-test00-RemoveCapacity01  ALARM     arn:aws:autoscalin...0-test00-inpolicy00  AWS/EC2    CPUUtilization  60      Average    2             LessThanOrEqualToThreshold     40.0
通常の状態であれば STATE 項目でスケールアウトが OK、スケールイン が ALARM になっていれば良い。ALARM は今現在閾値に引っかかって ALARM を出しているという状態。INSUFFICIENT_DATA になっていなければ何か設定がおかしいということ。
CloudWatch のログは mon-describe-alarm-history で見れる。アラームに引っかかったものや設定の更新が時系列に表示される。
$ mon-describe-alarm-history --region ap-northeast-1
demo00-test00-RemoveCapacity01  2013-07-22T09:02:45.790Z  Action               Successfully executed action arn:aws:autoscaling:ap-northeast-1:910777643605:scalingPolicy:0ce7a750-7fa1-46fc-a316-d2647013aa3f:autoScalingGroupName/demo00-test00-group00:policyName/demo00-test00-inpolicy00
demo00-test00-RemoveCapacity01  2013-07-22T09:02:45.759Z  StateUpdate          Alarm updated from OK to ALARM
demo00-test00-RemoveCapacity01  2013-07-22T08:59:45.776Z  StateUpdate          Alarm updated from ALARM to OK
demo00-test00-RemoveCapacity01  2013-07-22T08:55:45.772Z  Action               Successfully executed action arn:aws:autoscaling:ap-northeast-1:910777643605:scalingPolicy:0ce7a750-7fa1-46fc-a316-d2647013aa3f:autoScalingGroupName/demo00-test00-group00:policyName/demo00-test00-inpolicy00
demo00-test00-RemoveCapacity01  2013-07-22T08:55:45.768Z  StateUpdate          Alarm updated from OK to ALARM
demo00-test00-AddCapacity02     2013-07-22T08:46:41.129Z  ConfigurationUpdate  Alarm "demo00-test00-AddCapacity02" deleted
demo00-test00-AddCapacity03     2013-07-22T08:46:33.759Z  ConfigurationUpdate  Alarm "demo00-test00-AddCapacity03" deleted
demo00-test00-AddCapacity05     2013-07-22T08:46:24.615Z  ConfigurationUpdate  Alarm "demo00-test00-AddCapacity05" deleted
demo00-test00-AddCapacity05     2013-07-22T08:43:21.129Z  StateUpdate          Alarm updated from ALARM to OK
demo00-test00-AddCapacity05     2013-07-22T08:42:21.092Z  StateUpdate          Alarm updated from OK to ALARM
demo00-test00-AddCapacity04     2013-07-22T08:41:07.031Z  ConfigurationUpdate  Alarm "demo00-test00-AddCapacity04" deleted
demo00-test00-AddCapacity05     2013-07-22T08:40:25.609Z  StateUpdate          Alarm updated from INSUFFICIENT_DATA to OK
demo00-test00-AddCapacity05     2013-07-22T08:40:24.983Z  ConfigurationUpdate  Alarm "demo00-test00-AddCapacity05" created
demo00-test00-AddCapacity04     2013-07-22T08:39:33.834Z  Action               Successfully executed action arn:aws:autoscaling:ap-northeast-1:910777643605:scalingPolicy:801eb489-69c7-4ecd-8b5c-60e7509c9dbf:autoScalingGroupName/demo00-test00-group00:policyName/demo00-test00-outpolicy00
demo00-test00-AddCapacity04     2013-07-22T08:39:33.815Z  StateUpdate          Alarm updated from INSUFFICIENT_DATA to ALARM
また、実際のモニタリングの値を見たい時は、mon-get-stats コマンドを使う。
$ mon-get-stats CPUUtilization --region ap-northeast-1 --namespace AWS/EC2 --statistics Average --dimensions "AutoScalingGroupName=demo00-test00-group00"

(snip)

2013-07-23 00:22:00  25.615000000000002  Percent
2013-07-23 00:23:00  19.310000000000002  Percent
2013-07-23 00:24:00  23.115000000000002  Percent
2013-07-23 00:25:00  19.13               Percent
2013-07-23 00:26:00  23.505000000000003  Percent
2013-07-23 00:27:00  19.04               Percent
2013-07-23 00:28:00  15.985              Percent
2013-07-23 00:29:00  6.665               Percent
これで auto scaling group 全体の値が確認できる。
負荷テストして実際スケールさせる場合は、1インスタンスだけCPU使用率100%にしても複数インスタンス起動している場合は平均で見られるので、スケールしない。複数のインスタンスで負荷をかけて、mon-get-stats の値が閾値を超えたかどうか確認しつつ、インスタンスが自動的に起動されるか見ると良い。